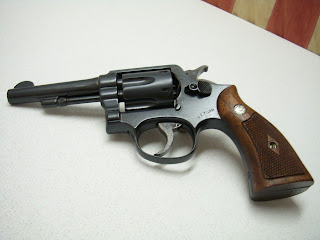
The object of this endeavor was to give the revolver discussed below a durable, consistent finish without obliterating the character or original stampings. Rust bluing was the original firearm finish, it is so labor intensive though, that "Hot" bluing was invented to replace it. Hot bluing involves caustic chemicals that will seriously hurt you and eat through anything, but give a quick and attractive finish. After imagining my daughter finding a bucket of salts and it eating through her arm like Alien blood, I decided to try rust bluing instead. It is a more durable finish than hot bluing, but not quite as shiny.
This firearm came to me with a patchy, inconsistent and worn patina which is fine but I think it deserved a new lease on life. I shot it once with the thin grips it came with and struggled with accuracy. As I begun the refinish, I dug through my parts and came up with a period correct set of diamond magna grips and nicely case colored trigger. In addition I sourced a hammer of the correct design, as this particular kind was only made for a couple of years.
First order of business was to strip the original bluing, so a soak in regular vinegar to remove the remaining bluing.
Then a bead blast with fine glass particles to clean the rest of the crud off and give a proper tooth for the bluing to stick.
I then boiled the parts in degreaser to leech out any oil left behind, greased the bore and chambers and a quick wipe with acetone.
For this process I used Brownell's "Classic rust blue", swabbed on with cotton balls held in forceps. Small parts such as screws and the thumb latch were boiled in the stainless contraption shown in the picture (flea market buy- could be used for tea or something originally?)
After the parts are cleaned and degreased thoroughly, the bluing solution is swabbed on, left to dry for an hour, then swabbed on again. The parts are left to sit and rust in a humid environment for 24 hours.
This leaves a coating of red oxide (rust) on the parts, the next step is to boil them for 30 min converting the red oxide to black oxide. I used stainless steel wire and a dowel to suspend them in the stainless pot (pot sourced at local Goodwill for $5, later found to be a $200 French stock pot 0_o)
Very shortly after hitting the boiling water the parts begin to turn black. After the 30 min of boiling, I took them out and flash dried them with a hair dryer.
The parts are covered in a velvety black substance that needs to be "carded" off. I used 0000 steel wool and it took about 2-1/2 hours to card the parts to my satisfaction each time. The solution is then applied again and the parts are allowed to rust for another 24 hours. I repeated this process 6 times total, each time the bluing got darker, shinier and more homogenous. Here are some pics of the rusting in action:
At this point I had over 20 hours invested. The steel wooling process is extremely tedious- I can't say I would recommend this process unless you are very patient and dedicated. Needless to say, I was overjoyed once the week had passed and I could start wrapping it up. Here's what everything looked like after the final carding:
I soaked the parts in a baking soda and water mixture to neutralize the bluing chemicals.Then a 2 hour boil in used motor oil (the carbon in the oil bonds to the freshly blued surface imparting more durability), left to cure for 22 more hours in the oil. This was the hardest part, I wanted to see it done!
After removing the parts, cleaning thoroughly and spraying down with eezox (rust preventative and lube) I reassembled with the new hammer and trigger. I also replaced the extremely worn hand that was contributing to some carry up issues (see post about carry up somewhere below)
Here are some before pics:
Note the patchy brownish finish and black rusty condition of the hammer and trigger. As a side note, I had considered re-case hardening the hammer and trigger, but it requires a forge capable of 1400 degrees (and a pyrometer to check it) which I do not have. maybe sometime in the future I will build one.
Here is the finished product:
You can see the finish is sort of a bluish black satin color, shinier than the matte finish of a model 28 and just a bit duller than the low polish of my 38/44 outdoorsman. The hammer and trigger have nice blueish purple and straw colored case hardening and the revolver is now wearing the correct post war diamond magnas (much easier to hold on to). You can still see the various dings and wear that I did not sand out of the metal, but is bothers me less than the rounded edges and scrubbed stampings would (The pictures show quite a bit of lint from wiping it down). I took it to the range today, and I shot it pretty good for a fixed sight revolver. It is very light and handy, the trigger is exceptional in SA and DA. Here's some targets I shot at 10 yards offhand (4" of black): There are six shots on the left target, can you spot the last one?
Overall a satisfying project, but I don't think I would do a whole revolver again, maybe a rifle barrel or slide perhaps?


No comments:
Post a Comment